หลังจากที่เราได้ลองติดตั้ง Tensorflow Object Detection มาใช้ในการตรวจจับวัตถุ พบว่า Bounding Box ไม่ค่อยนิ่งเท่าไหร่ เลยจะไปลองอีกตัวหนึ่งก็คือ YOLO Object Detection ที่ใช้ Darkflow ซึ่งผลที่ได้ก็คือ YOLO สามารถ Detect ได้เร็วกว่าและมีความแม่นยำสูง
Requirement
Download
Install
STEP1
- ทำการดาวน์โหลด Darkflow จาก GitHub
# C:\> git clone https://github.com/thtrieu/darkflow.git
# C:\> cd darkflow- ทำการสร้าง Virtual Environment
# C:\models> mkvirtualenv yolo
# C:\models> workon yolo- ทำการสร้างไฟล์ requirements.txt
opencv-contrib-python==3.4.2.16
opencv-python==3.4.2.16
scikit-learn==0.22.2
tensorflow-gpu==1.13.1
filterpy==1.1.0
numpy==1.19.3
matplotlib
Cython
numba- ทำการติดตั้ง Package จากไฟล์ requirements.txt
# (yolo) C:\darkflow> pip install -r requirements.txtSTEP2
- ทำการดาวน์โหลด Tiny Weights จาก YOLO
# (yolo) C:\darkflow> wget https://pjreddie.com/media/files/yolov3-tiny.weights -o 'bin/'- ทำการสร้างไฟล์ detect_images.py
from darkflow.net.build import TFNet
import matplotlib.pyplot as plt
import numpy as np
import cv2
options = {"model": "cfg/yolo.cfg",
"load": "bin/yolo.weights",
"threshold": 0.1,
"gpu": 1.0}
tfnet = TFNet(options)
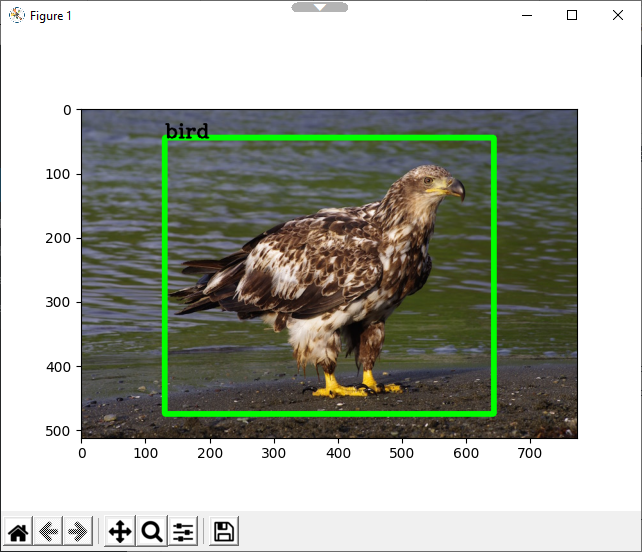
img = cv2.imread('sample_img/sample_eagle.jpg', cv2.IMREAD_COLOR)
img = cv2.cvtColor(img, cv2.COLOR_BGR2RGB)
result = tfnet.return_predict(img)
img.shape
tl = (result[0]['topleft']['x'], result[0]['topleft']['y'])
br = (result[0]['bottomright']['x'], result[0]['bottomright']['y'])
label = result[0]['label']
img = cv2.rectangle(img, tl, br, (0, 255, 0), 7)
img = cv2.putText(img, label, tl, cv2.FONT_HERSHEY_COMPLEX, 1, (0, 0, 0), 2)
plt.imshow(img)
plt.show()- ทำการรัน detect_images.py
# (yolo) C:\darkflow> python detect_images.py- ลองดูผลลัพธ์
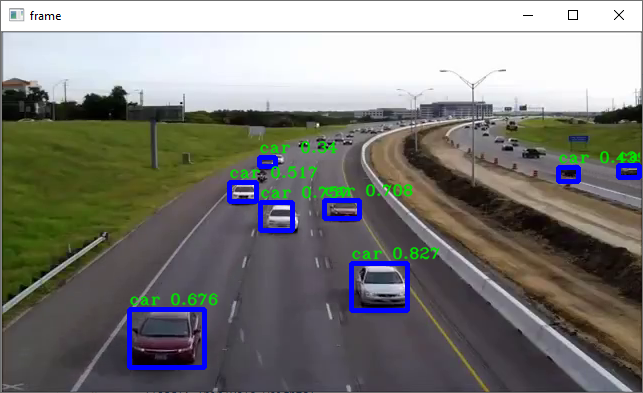
- ทำการสร้างไฟล์ detect_video.py
from darkflow.net.build import TFNet
import numpy as np
import cv2

options = {"model": "cfg/yolo.cfg",
           "load": "bin/yolo.weights",
           "threshold": 0.1,
           "cpu": 1.0}

tfnet = TFNet(options)

def boxing(original_img, predictions):
    newImage = np.copy(original_img)

    for result in predictions:
        top_x = result['topleft']['x']
        top_y = result['topleft']['y']
        btm_x = result['bottomright']['x']
        btm_y = result['bottomright']['y']
        confidence = result['confidence']
        label = result['label'] + " " + str(round(confidence, 3))

        if confidence > 0.3:
            newImage = cv2.rectangle(newImage, (top_x, top_y), (btm_x, btm_y), (255,0,0), 3)
            newImage = cv2.putText(newImage, label, (top_x, top_y-5), cv2.FONT_HERSHEY_COMPLEX_SMALL , 0.8, (0, 230, 0), 1, cv2.LINE_AA)

    return newImage

cap = cv2.VideoCapture('./sample_video/input.mp4')
width = cap.get(cv2.CAP_PROP_FRAME_WIDTH)
height = cap.get(cv2.CAP_PROP_FRAME_HEIGHT)
fourcc = cv2.VideoWriter_fourcc(*'DIVX')
out = cv2.VideoWriter('./sample_video/output.avi',fourcc, 20.0, (int(width), int(height)))

while(True):
    ret, frame = cap.read()

    if ret == True:
        frame = np.asarray(frame)
        results = tfnet.return_predict(frame)
        new_frame = boxing(frame, results)
        out.write(new_frame)
        cv2.imshow('frame',new_frame)
        if cv2.waitKey(1) & 0xFF == ord('q'):
            break
    else:
        break

cap.release()
out.release()
cv2.destroyAllWindows()- ลองดูผลลัพธ์
อ่านเพิ่มเติม : https://bit.ly/3mQIYTI
Leave a Reply