การใช้งาน Version Control มีมานานแล้วสำหรับเหล่า Programmer และ Developer โดยในสายงานด้าน Data Science ที่ทำเกี่ยวกับ Machine Learning ก็มี Version Control เหมือนกัน เรียกว่า DVC ซึ่งจะคล้าย ๆ กับ Git
Workflow
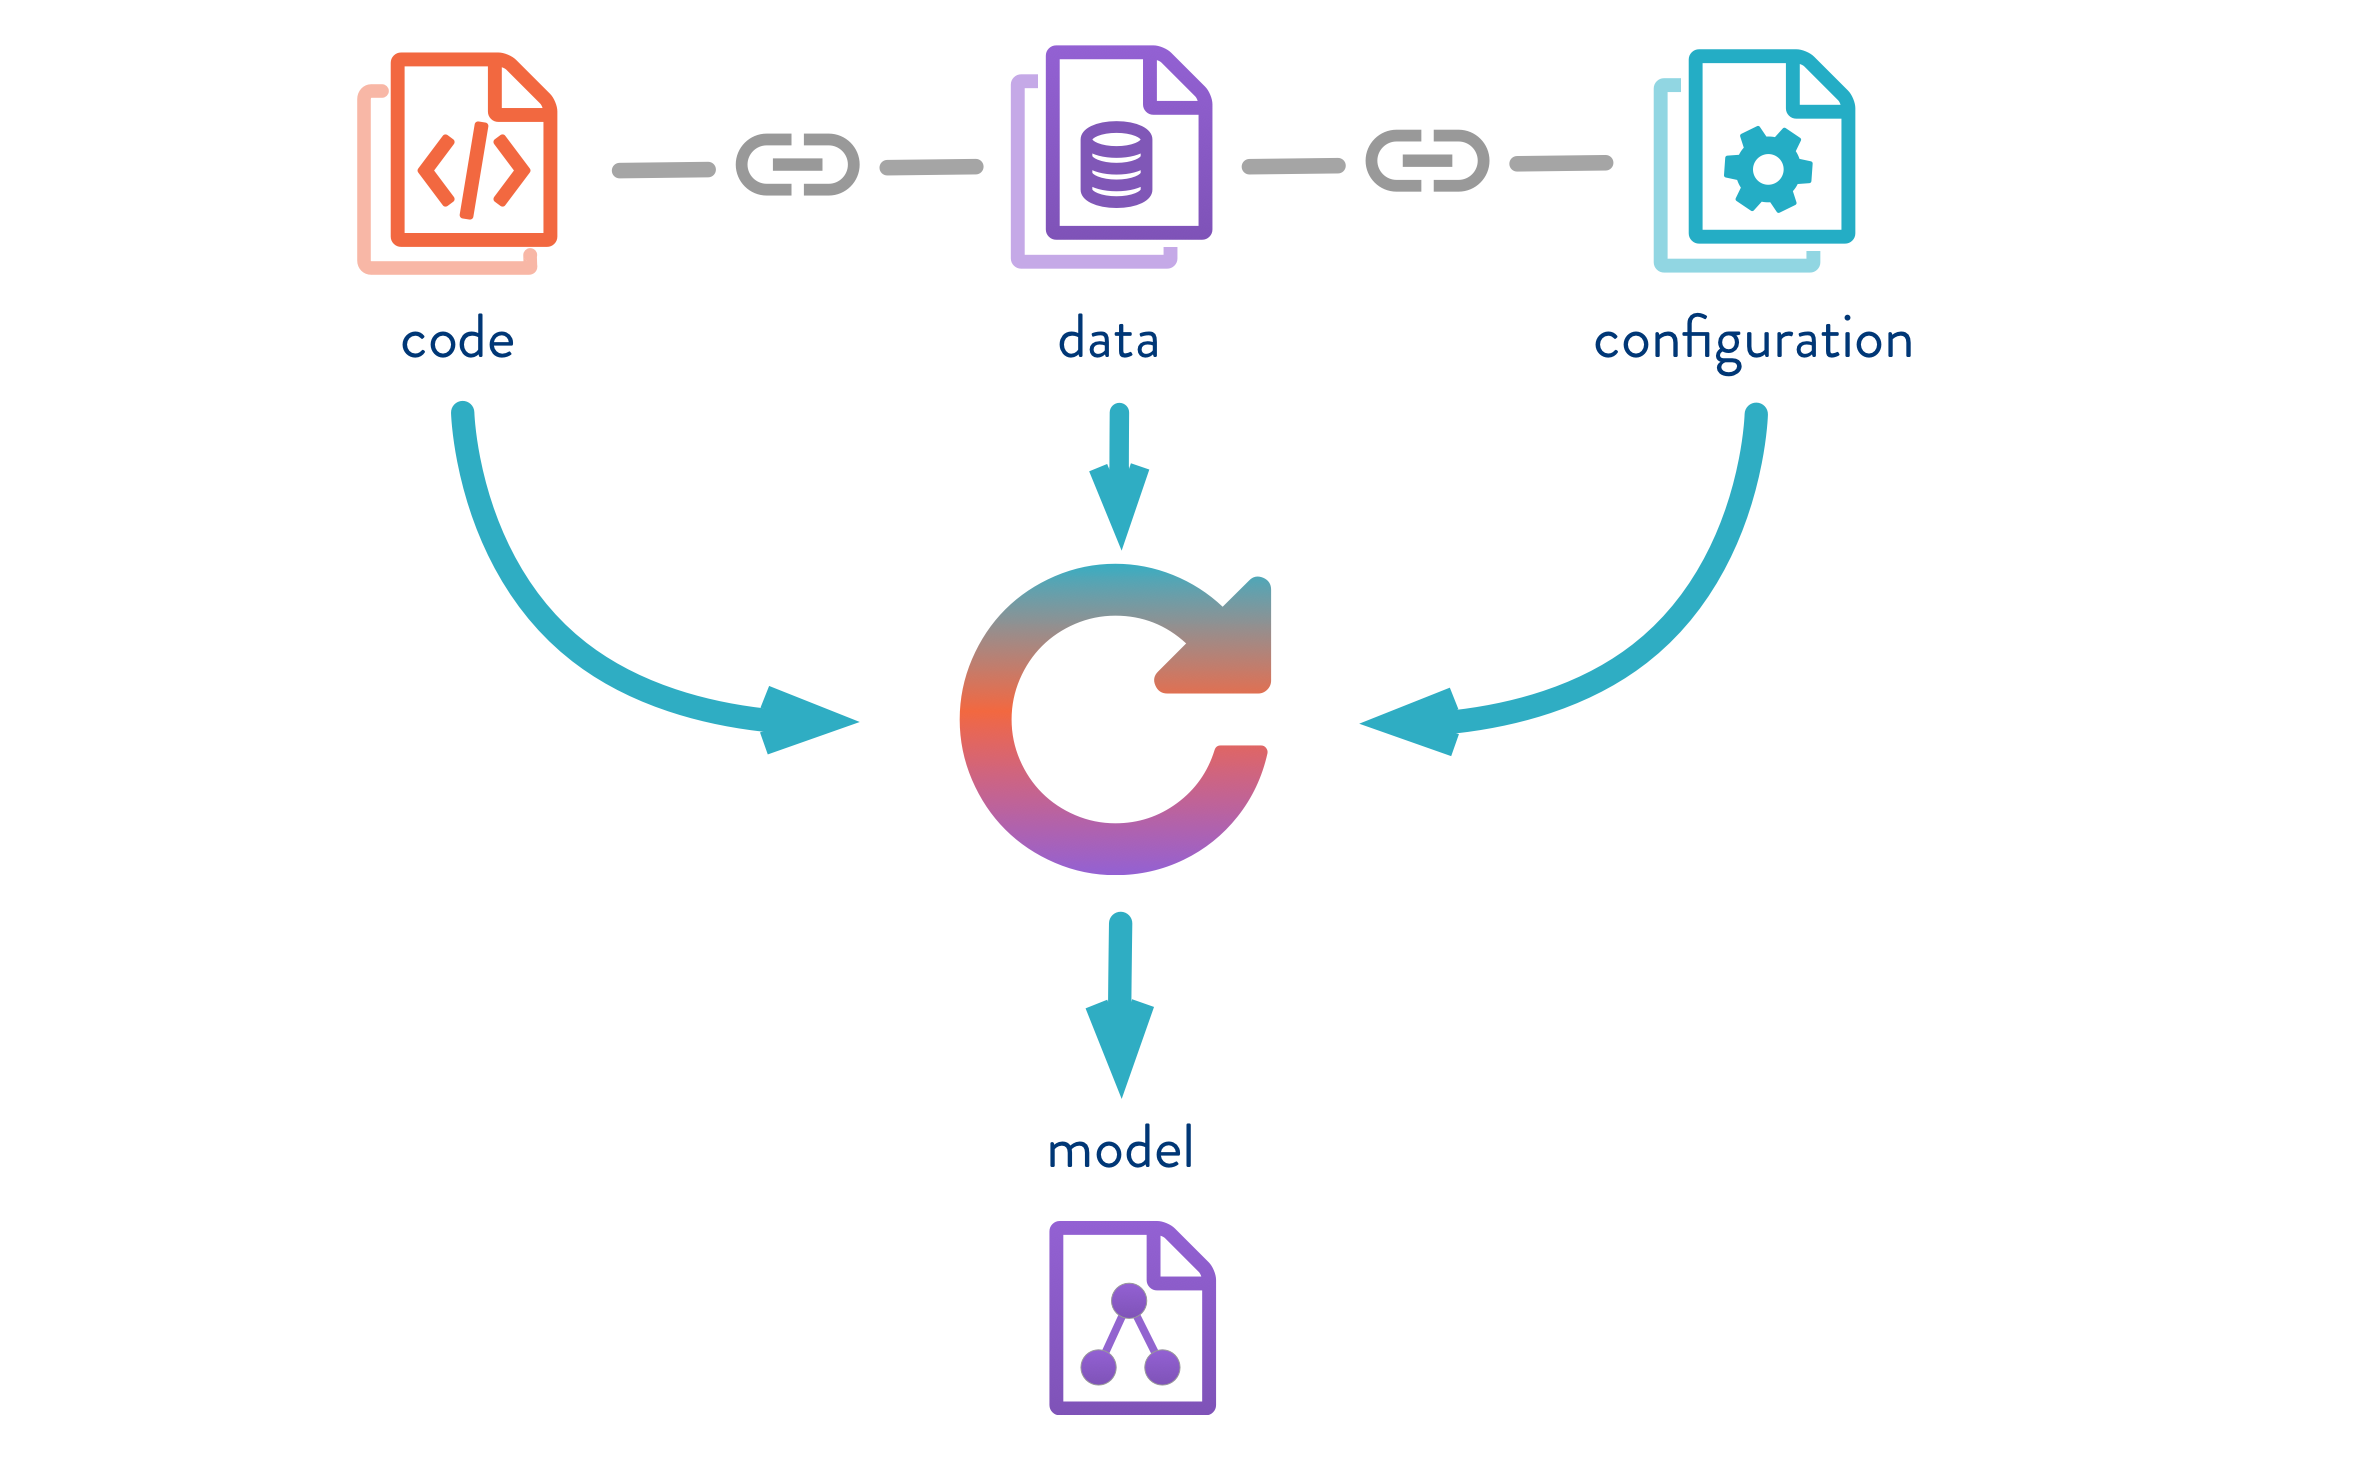
โดยปกติการสร้าง Model ของ Machine Learning จะประกอบไปด้วย 3 ส่วน คือ Code, Data และ Configuration นำมา Train เพื่อให้ได้ Model และจะมีการทำ Reproduce
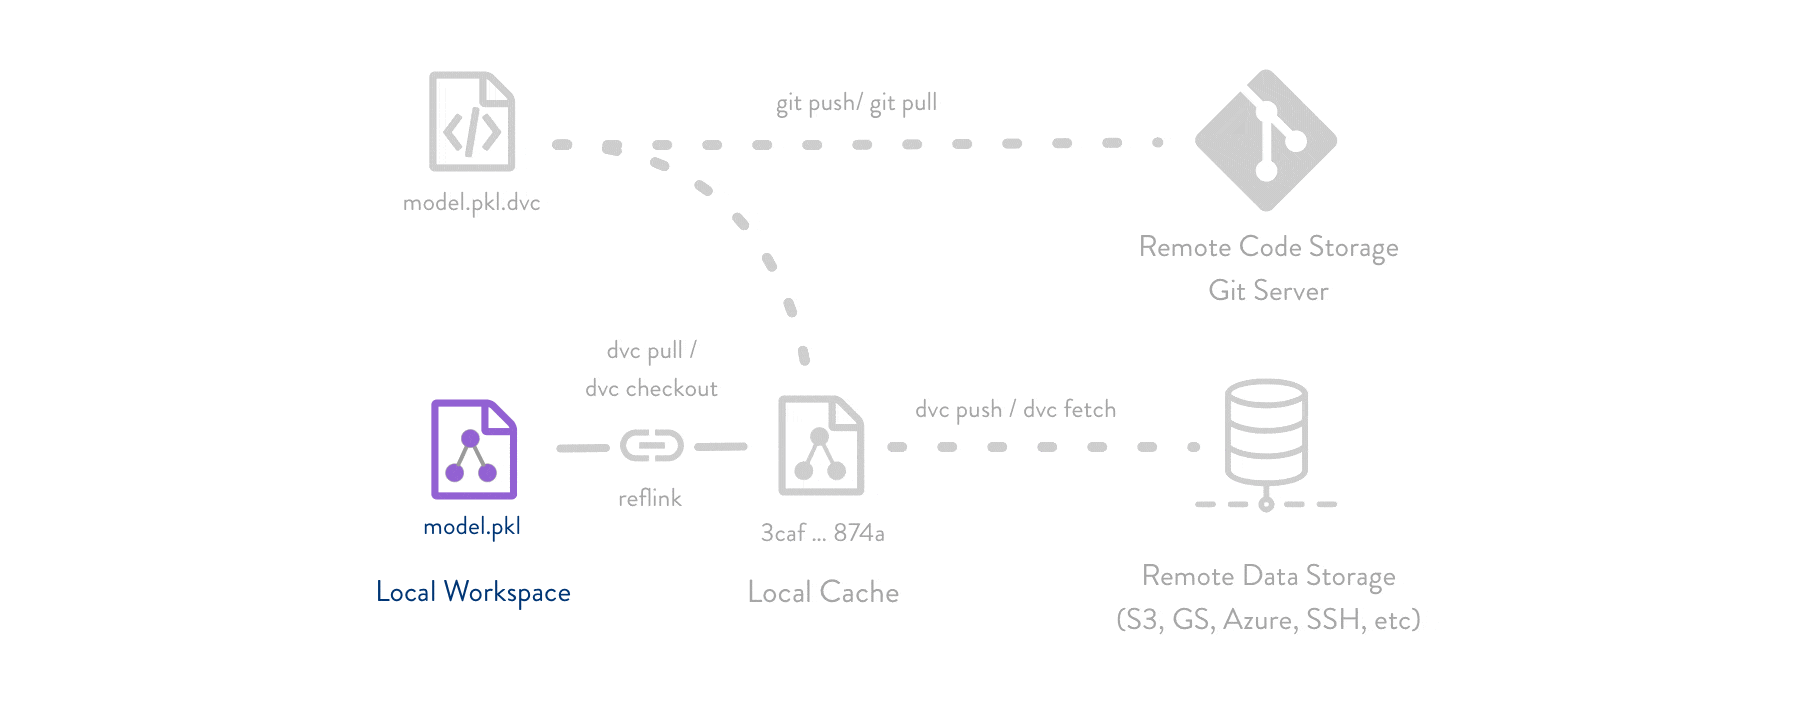
หลักการทำงานของ DVC จะคล้าย ๆ กับ Git แต่จะแบ่่งการเก็บออกเป็น 2 แบบ คือ ส่วนที่เป็น Code จะเก็บอยู่ใน Remote Code Storage ของ Git Server และส่วนที่เป็น Model จะเก็บอยู่ใน Remote Data Storage เช่น S3, GS, Azure, SSH ตามรูปด้านล่าง
Download
Get Started
- ทำการดาวน์โหลดและติดตั้ง DVC
- ทำการดาวน์โหลด Code และสร้าง Git Repository
# C:\dvc> git init
# C:\dvc> wget https://dvc.org/s3/examples/so/code.zip
# C:\dvc> unzip code.zip && rm -f code.zip
# C:\dvc> git add code/
# C:\dvc> git commit -m "download and initialize code"- ทำการสร้าง Virtual Environment
# C:\dvc> mkvirtualenv venv
# C:\dvc> workon venv- ทำการติดตั้ง Package จากไฟล์ requirements.txt
# (venv) C:\nlp> pip install -r code/requirements.txt- ทำการสร้าง DVC Repository
# (venv) C:\nlp> dvc init
# (venv) C:\nlp> git commit -m "initialize DVC"- ทำการดาวน์โหลด Dataset และทำการ Add ใน DVC ด้วย
# (venv) C:\nlp> mkdir data
# (venv) C:\nlp> wget -P data https://dvc.org/s3/examples/so/Posts.xml.zip
# (venv) C:\nlp> dvc add data/Posts.xml.zip- ทำการ Commit การเปลี่ยนแปลงไปยัง Git Repository
# (venv) C:\nlp> git add data/Posts.xml.zip.dvc data/.gitignore
# (venv) C:\nlp> git commit -m "add dataset"- ทำการ Run ใน DVC เพื่อรวบรวมคำสั่งในแต่ละ Stage
# (venv) C:\nlp> dvc run -d data/Posts.xml.zip ^
          -o data/Posts.xml ^
          -f extract.dvc ^
unzip data/Posts.xml.zip -d data- ทำการ Convert ไฟล์จาก XML เป็น TSV ใน DVC เพื่อทำ Feature Extraction ได้ง่ายขึ้น
# (venv) C:\nlp> dvc run -d code/xml_to_tsv.py -d data/Posts.xml ^
          -o data/Posts.tsv ^
          -f prepare.dvc ^
python code/xml_to_tsv.py data/Posts.xml data/Posts.tsv- ทำการ Split Dataset ใน DVC เพื่อแบ่งข้อมูลที่ใช้ในการ Training และ Test โดยกำหนดให้ Test Dataset มีอัตราส่วนเป็น 0.2 และกำหนดค่า Seed ในการ Random เป็น 20170426
# (venv) C:\nlp> dvc run -d code/split_train_test.py -d data/Posts.tsv ^
          -o data/Posts-train.tsv -o data/Posts-test.tsv ^
          -f split.dvc ^
          python code/split_train_test.py data/Posts.tsv 0.2 20170426 ^
data/Posts-train.tsv data/Posts-test.tsv- ทำการ Extract Feature and Label ใน DVC ซึ่งจะได้ไฟล์ Pickle
# (venv) C:\nlp> dvc run -d code/featurization.py -d data/Posts-train.tsv -d data/Posts-test.tsv ^
          -o data/matrix-train.pkl -o data/matrix-test.pkl ^
          -f featurize.dvc ^
          python code/featurization.py data/Posts-train.tsv data/Posts-test.tsv ^
data/matrix-train.pkl data/matrix-test.pkl- ทำการ Train Model กับ Training Dataset ใน DVC
# (venv) C:\nlp> dvc run -d code/train_model.py -d data/matrix-train.pkl ^
          -o data/model.pkl ^
          -f train.dvc ^
python code/train_model.py data/matrix-train.pkl 20170426 data/model.pkl- ทำการ Evaluate Model กับ Test Dataset ใน DVC
# (venv) C:\nlp> dvc run -d code/evaluate.py -d data/model.pkl -d data/matrix-test.pkl ^
          -M auc.metric ^
          -f evaluate.dvc ^
python code/evaluate.py data/model.pkl data/matrix-test.pkl auc.metric- ทำการตรวจสอบ Accuracy ใน DVC ด้วย Metric
# (venv) C:\nlp> dvc metrics show
auc.metric: AUC: 0.587951- ทำการ Commit การเปลี่ยนแปลงไปยัง Git Repository
# (venv) C:\nlp> git add *.dvc auc.metric
# (venv) C:\nlp> git commit -am "create pipeline"- ทำการแก้ไขไฟล์ code/featurization.py ( บรรทัดที่ 72-73 )
# (venv) C:\nlp> notepad code/featurization.pybag_of_words = CountVectorizer(stop_words='english',
max_features=5000,
ngram_range=(1, 2))- ทำการ Reproduce สำหรับทุก Stage ซึ่งจะทำแบบ Auto หากมีการแก้ไขไฟล์
# (venv) C:\nlp> dvc repro evaluate.dvc- ทำการตรวจสอบ Accuracy ใน DVC ด้วย Metric ในทุก Branch
# (venv) C:\nlp> dvc metrics show -a- ทำการ Commit การเปลี่ยนแปลงไปยัง Git Repository
# (venv) C:\nlp> git add evaluate.dvc auc.metric
# (venv) C:\nlp> git commit -m "add evaluation step to the pipeline- ทำการ Tag ในการเก็บ Checkpoint เพื่อใช้ในการ Compare
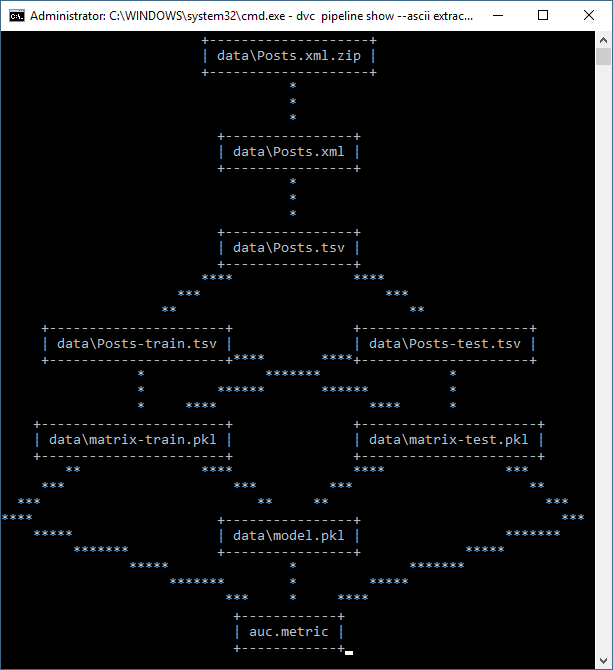
# (venv) C:\nlp> git tag -a "baseline-experiment" -m "baseline"- ทำการ Show Pipeline แบบ ASCII
# (venv) C:\nlp> dvc pipeline show --ascii train.dvc
# (venv) C:\nlp> dvc pipeline show --ascii train.dvc --commands
# (venv) C:\nlp> dvc pipeline show --ascii train.dvc --outs- จะแสดง Visualize Pipeline ในแบบ ASCII
อ่านเพิ่มเติม : https://bit.ly/2FOQM5v
Leave a Reply